Elecron.js is one of the most emerging technologies which is used to design desktop-based software applications. You can now easily build cross-platform apps using JavaScript, HTML, and CSS. There are distinguished apps that exist in the market which are made in Electron. Such as VSCode, Whatsapp. You can also build real-time apps easily. Desktop app development is much in demand just like web development services. Electron is the platform that helps developers to develop cross-platform desktop applications with the help of web technologies such as HTML, JavaScript, and CSS.
What is Electron.js
Electron.js is an open-source project and it has a great community to manage. It is mainly designed to make a desktop application. You can run the built-in Windows 7 or later, macOS Yosemite or Linux.
Electron.js is also used with Ionic. Once you design the app in ionic then you can convert that app in Desktop too using Electron.js.
Prerequisite:
1. Basic Knowledge of HTML, JavaScript, CSS.
2. Newest Node.js installed in the system.
3. Development Tool (VSCode)
Development Steps:
Here we will make build for windows app, you can create another platform build with just 1 command same as windows
Step 1: Create a blank project using npm init
Step 2: Edit the package.json with the below code.
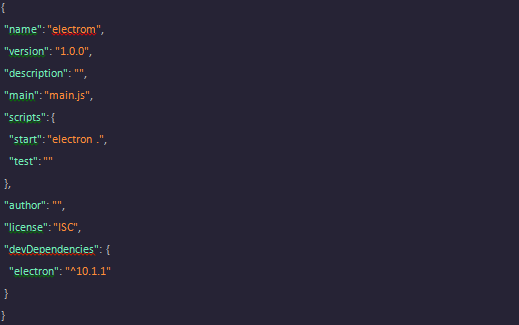
Step 3: Run this command to install the Electron in the project.
- npm install -g electron-prebuilt
Note: As you can see we have set the main file as named main.js so when we run the Electron app then main.js will be the first file to run. And it will be responsible to open the Window.
We are going to create a simple Todo List app with bootstrap 4.
So let’s design the main.js file.
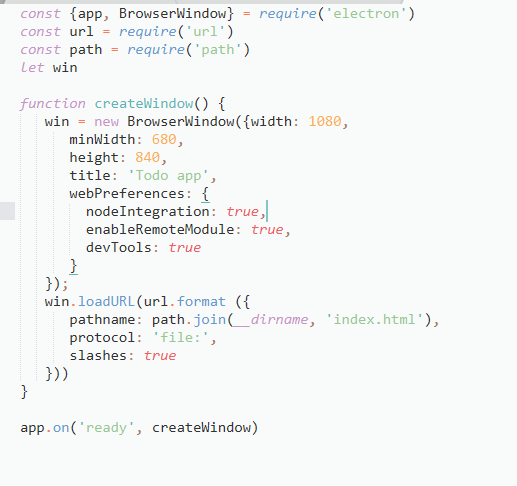
In this file, We first create a window with some properties such as height, width, title etc. of the window. Once the window is ready then it will load the index.html file in the window. As we have given in code.
So let’s design an index.html file.
First, load the bootstrap 4 CSS link and require jquery.

Now, Bootstrap has been added to our app. So now let’s add a simple one textbox for add tasks and one button to add a task in the list.
When we add a task then to show that all tasks we’ll design a list on the same page. To add dynamic tasks to the list we need one div with id so we’ll design one div with id names as todo-list.
Design the page in <body> tag.
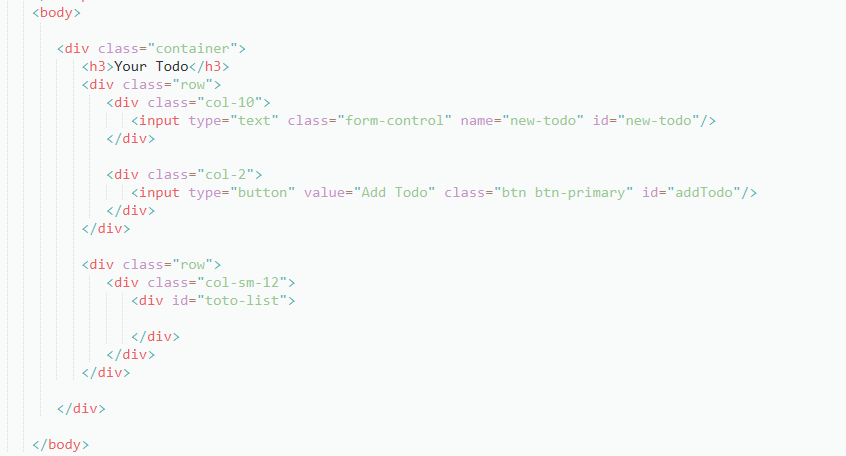
Once you added this code in the HTML file then try to run your app.
To run your app run this command.
- npm start
When the window opens you will see this screen.

If you can see this screen then congratulations you have successfully set up the Electron app and welcome to the world of Electron.
Now to handle the click event of the Add Todo button, We have to add one js file to handle it clicks event.
So let’s add the index.js file in the root level of the app and add it in the index.html file.
Add this code at the bottom of the file. (index.html)
<script type="text/javascript">
require('./index.js')
</script>
This will be the structure when you add the index.js file in the app code.
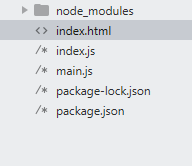
We’ll use the ipcMain and ipcRenderer feature of the Electron to make a communication or data passing from HTML file to js file.
ipcMain - Used to listen to events from .html file to .js file.
ipcRenderer - Used to pass the data from .js file to .html file
So Let’s start to design index.js files.
First, We’ll add 4 common lines that are used in almost all the files.

Now, Let’s handle the click event of adding the Todo button from the HTML file.
To store all the user data we’ll use one array for that.

As we send the array data to the HTML file so now let’s handle the ‘todo-data’ in HTML also.
So we’ll handle that in script tag only. Now add these lines in the index.html file.
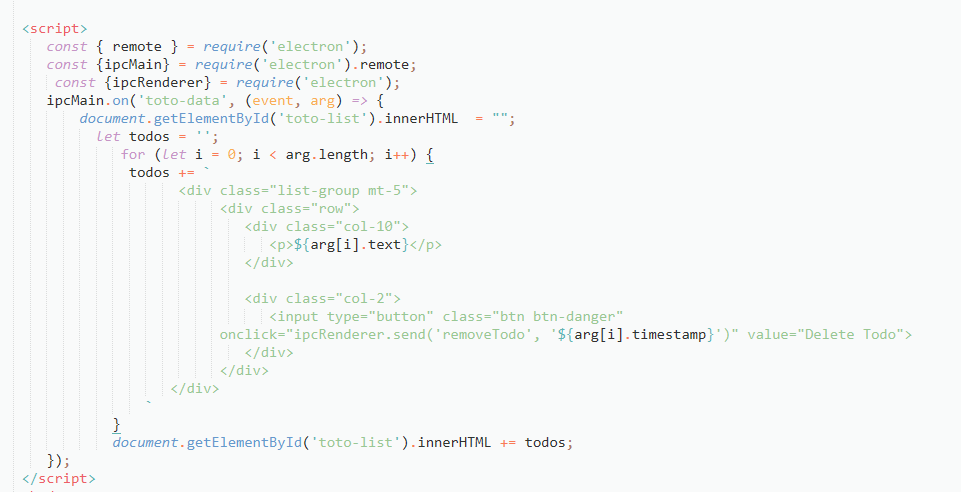
Once you add this code and try to add Todo in the text box and click on the button then you will see all tasks in the list view.
After adding Todo you will get the screen like below.
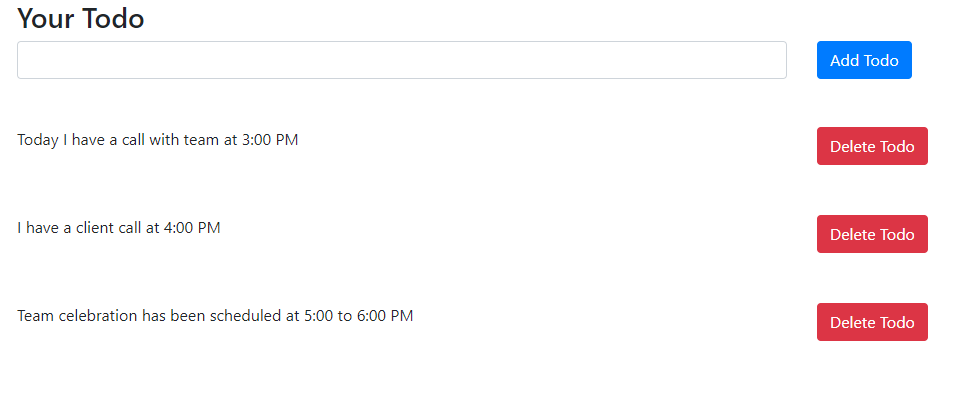
Here, you can delete the Todo from your list if you want. For delete Todo, I have passed time-stamp in
Delete the Todo button click event to delete particular Todo from the list.
As you can see in the code, We’ll make communication in the removeTodo thread of ipc. So now we have to handle this event in Electron. So we’ll handle that in the index.js file.

After deleting particular data from the list we again need to pass an updated array In HTML. So for that, we’ll use the same render method which we used above while adding new data in the Todo list.
So now when you click on the delete button from the UI then it will be deleted from the array too.
So finally, you are ready to go and use the Todo app in your system. Now we are storing data in an array but of course, you can call the store that in the database via API call.
Now the final step is to make a .exe file of this app. As of now it’s in development mode.
Add these lines in the package.json file

Run these two commands to make a build in windows.
1. npm run package: win
2. npm run package: installer
Note: You need to set the logo path based on your structure.
On the root level of the app you will see our folder and in that folder you will see another two folders.
Now go to the second folder named windows-installer and that’s it. You will see the .exe file.
Conclusion
Now, that you have known how Electron JS development can help you get the perfect desktop application, look nowhere other than ManekTech, which is the leading Electron JS Development Company to help you build the perfect desktop application.
About Author
Recent Blogs
Subscribe to Our Newsletter!
Join us to stay updated with our latest blog updates, marketing tips, service tips, trends, news and announcements!


