An app's user base using Firebase Analytics, a free and unlimited analytics solution. You'll be able to learn who your users are and how they interact with your app.
Google Analytics for Firebase collects usage and behavior data for your app. The SDK logs two primary types of information:
Events: What is happening in your app, such as user actions, system events, or errors.
User properties: Attributes you define to describe segments of your user base, such as language preference or geographic location.
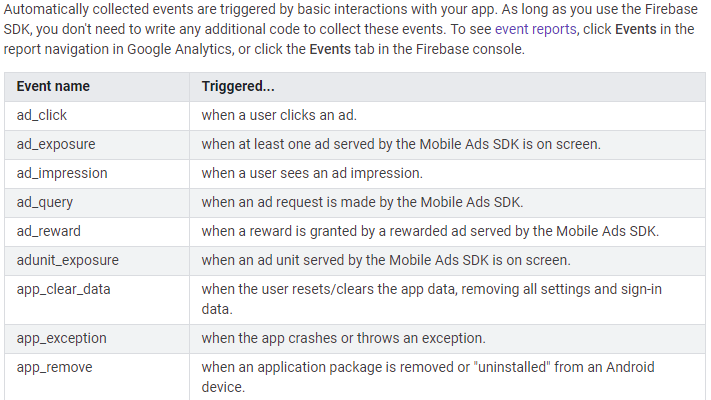
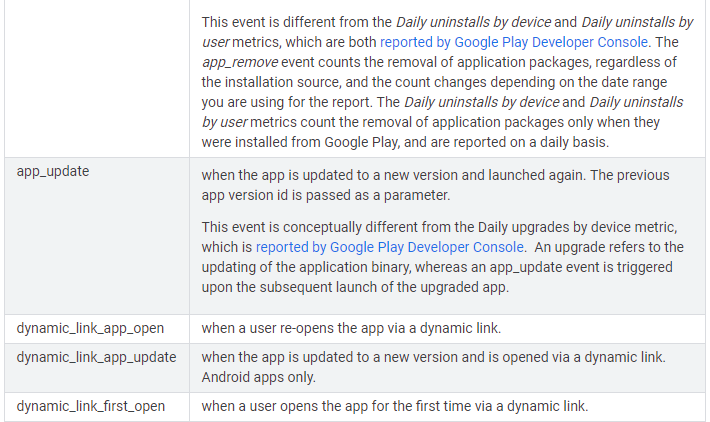
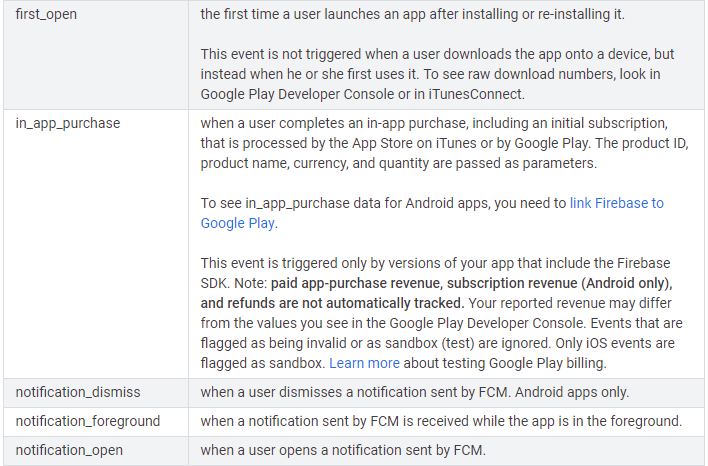
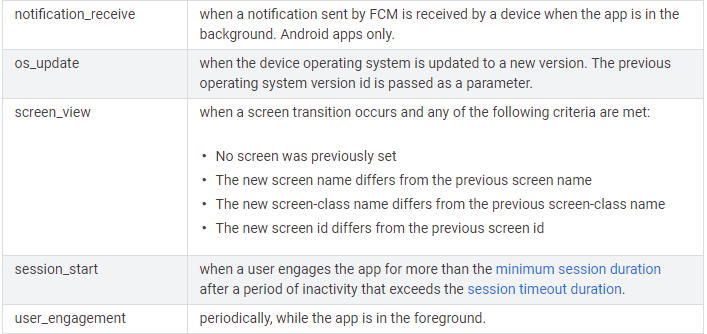
1. Automatically collected events

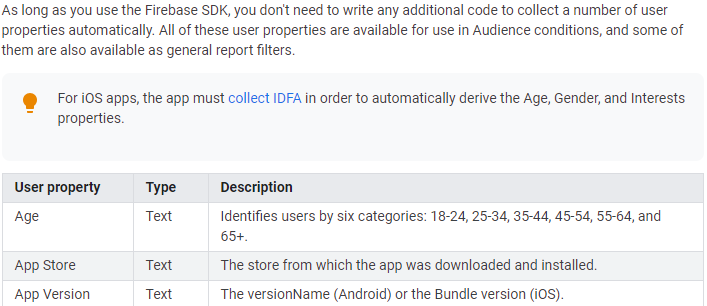
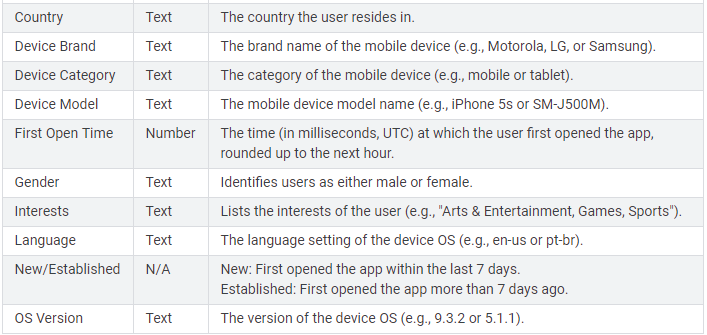
2. Automatically collected user properties
Add Analytics to Android:
1.Add the dependency for the Google Analytics for Firebase Android library to your module (app-level) Gradle file (usually app/build.gradle):.
implementation 'com.google.firebase:firebase-core:16.0.8'
2.Declare the com.google.firebase.analytics.FirebaseAnalytics object at the top of your activity:
In JAVA
private FirebaseAnalytics mFirebaseAnalytics;
In Kotlin
private lateinit var firebaseAnalytics: FirebaseAnalytics
3. Initialize it in the onCreate() method:
In JAVA
// Obtain the FirebaseAnalytics instance.
mFirebaseAnalytics = FirebaseAnalytics.getInstance(this);
In Kotlin
private lateinit var firebaseAnalytics: FirebaseAnalytics
4. Log Events:
After you have created a FirebaseAnalytics instance, you can use it to log either predefined or custom events with the logEvent() method. You can explore the predefined events and parameters in the FirebaseAnalytics.Event and FirebaseAnalytics.Param reference documentation.
The following code logs a SELECT_CONTENT event when a user clicks on a specific element in your app.
In JAVA
Bundle bundle = new Bundle();
bundle.putString(FirebaseAnalytics.Param.ITEM_ID, id);
bundle.putString(FirebaseAnalytics.Param.ITEM_NAME, name);
bundle.putString(FirebaseAnalytics.Param.CONTENT_TYPE, "image");
mFirebaseAnalytics.logEvent(FirebaseAnalytics.Event.SELECT_CONTENT, bundle);
In Kotlin
val bundle = Bundle()
bundle.putString(FirebaseAnalytics.Param.ITEM_ID, id)
bundle.putString(FirebaseAnalytics.Param.ITEM_NAME, name)
bundle.putString(FirebaseAnalytics.Param.CONTENT_TYPE, "image")
5.Confirm Events:
You can enable verbose logging to monitor logging of events by the SDK to help verify that events are being logged properly. This includes both automatically and manually logged events.You can enable verbose logging with a series of adb commands:
adb shell setprop log.tag.FA VERBOSE
adb shell setprop log.tag.FA-SVC VERBOSE
adb logcat -v time -s FA FA-SVC
Add Analytics to iOS:
1.Add the dependency for Firebase to your Podfile:
pod 'Firebase/Core'
2.Run pod install and open the created .xcworkspace file.
3.Import the Firebase module in your UIApplicationDelegate:
In Swift
import Firebase
In Objective-C
@import Firebase;
4.Configure a FirebaseApp shared instance, typically in your application's application:
didFinishLaunchingWithOptions: method:
In Swift
// Use Firebase library to configure APIs
FirebaseApp.configure()
In Objective-C
// Use Firebase library to configure APIs
[FIRApp configure];
5.Log events:
After you have configured the FirebaseApp instance, you can begin to log events with the logEventWithName() method. You can explore the predefined events and parameters in the FIREventNames.h and FIRParameterNames.h header files.
The following example demonstrates how to log a suggested kFIREventSelectContent event to indicate a user has clicked on a specific element in your app:
In Swift
Analytics.logEvent(AnalyticsEventSelectContent, parameters: [
AnalyticsParameterItemID: "id-\(title!)",
AnalyticsParameterItemName: title!,
AnalyticsParameterContentType: "cont" ])
In Objective-C
[FIRAnalytics logEventWithName:kFIREventSelectContent
parameters:@{
kFIRParameterItemID:[NSString stringWithFormat:@"id-%@", self.title],
kFIRParameterItemName:self.title,
kFIRParameterContentType:@"image"
}];
6. To view this event in the Xcode debug console, enable Analytics debugging:
1.In Xcode, select Product > Scheme > Edit scheme...
2.Select Run from the left menu.
3.Select the Arguments tab.
4.In the Arguments Passed On Launch section, add -FIRAnalyticsDebugEnabled.
Add Firebase to your Android app
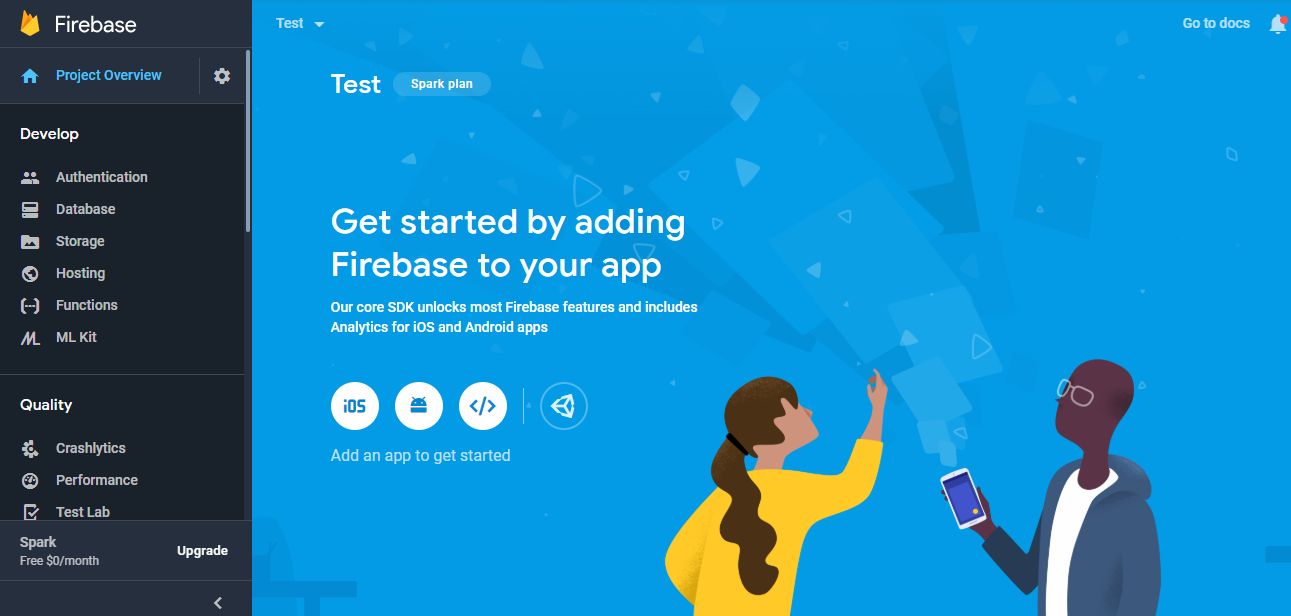
1.Add Firebase using the Firebase console:
Adding Firebase to your app involves tasks both in the Firebase console and in your open Android project (for example, you download Firebase config files from the console, then move them into your Android project).
2.Create a Firebase project:
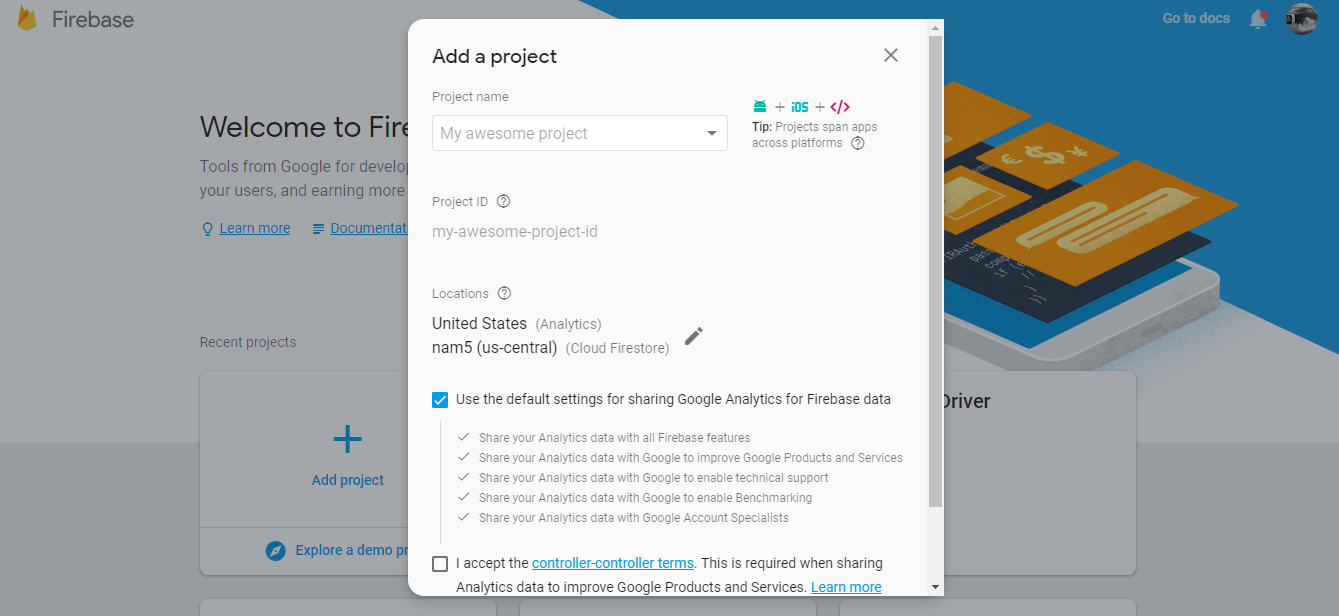
In the Firebase console, click Add project, then select or enter a Project name.
If you have an existing Google Cloud Platform (GCP) project, you can select the project from the Project name dropdown menu. Otherwise, enter a new Project name.
3. Register your app with Firebase:
In the center of the Firebase console's project overview page, click the Android icon to launch the setup workflow.
If you've already added an app to your Firebase project, click Add app to display the platform options.
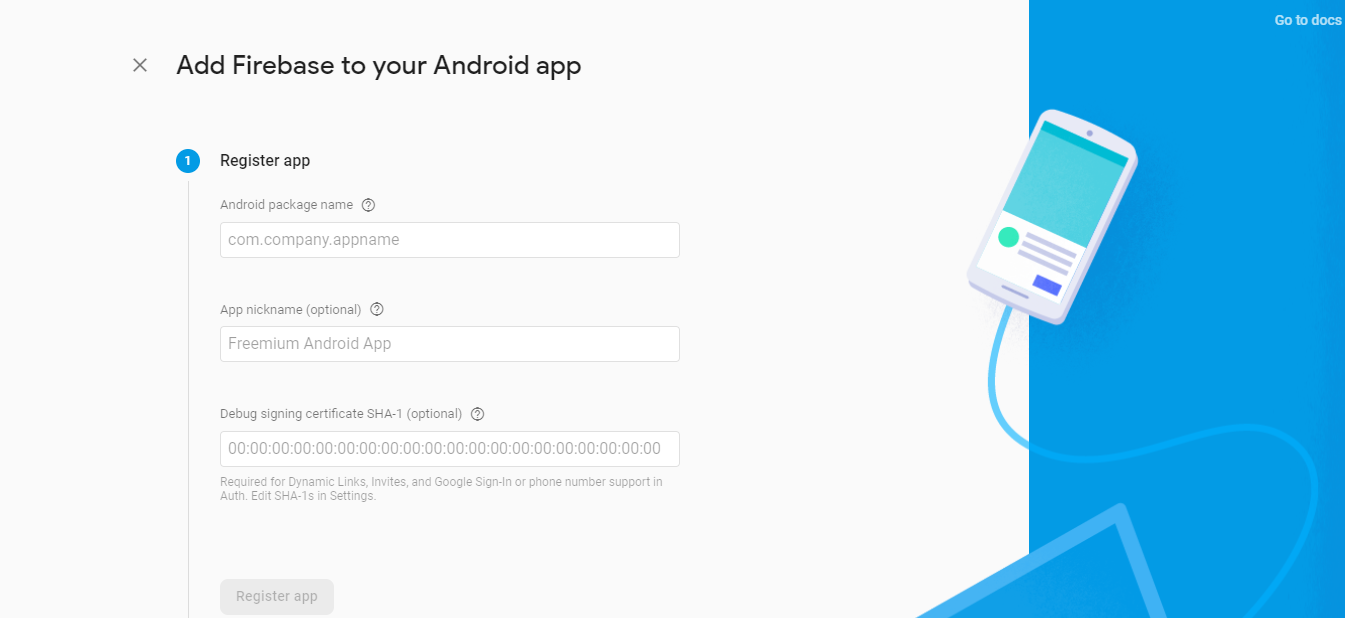
4.Enter your app's application ID in the Android package name field:
After add application Id Click Register app.
5.Add a Firebase configuration file:
Add the Firebase Android configuration file to your app:
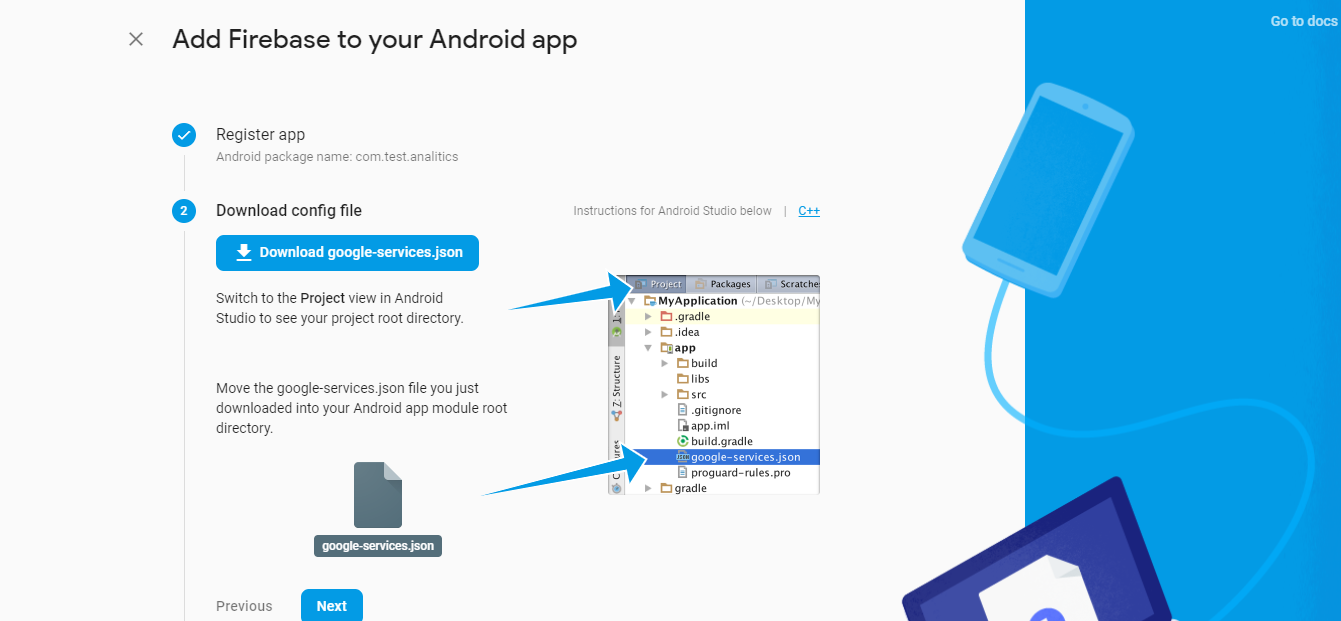
Click Download google-services.json to obtain your Firebase Android config file (google-services.json).
You can download your Firebase Android config file again at any time.
Move your config file into the module (app-level) directory of your app.
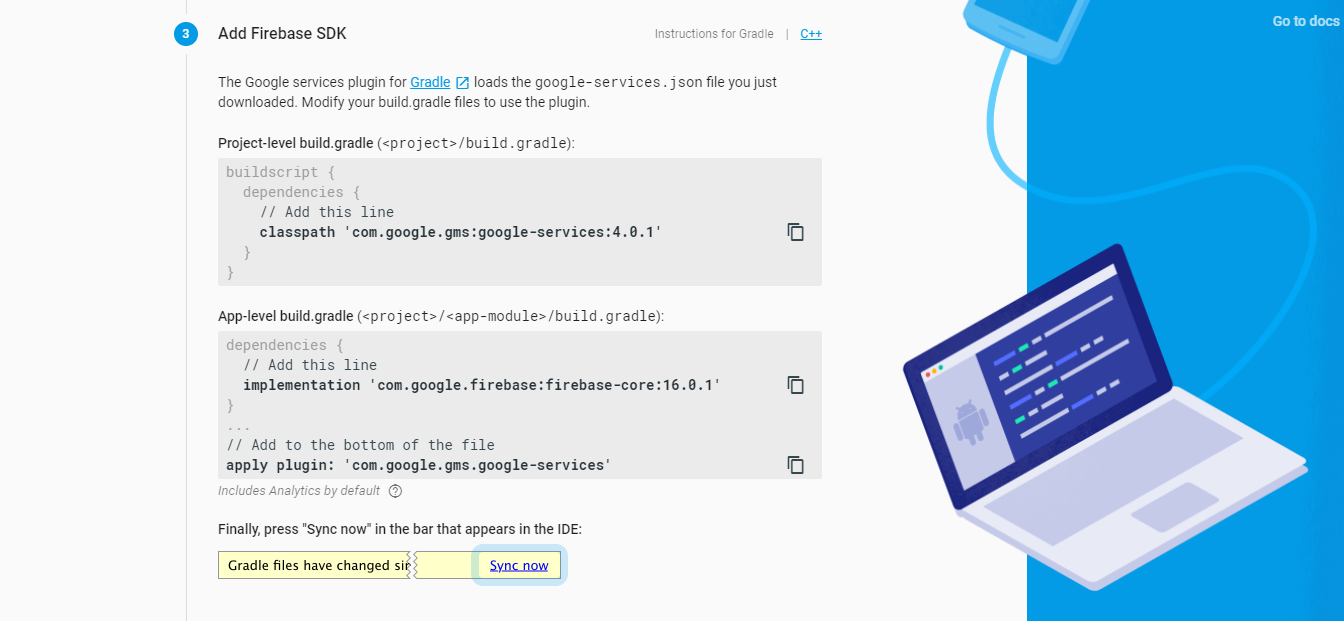
To enable Firebase products in your app, add the google-services plugin to your Gradle files:
In your root-level (project-level) Gradle file (build.gradle), add rules to include the Google Services plugin. Check that you have Google's Maven repository, as well.
In your module (app-level) Gradle file (usually app/build.gradle), add a line to the bottom of the file.
6. Add Firebase SDKs to your app:
In your module (app-level) Gradle file (usually app/build.gradle), add the dependency for the core Firebase SDK:
dependencies {
// ...
implementation 'com.google.firebase:firebase-core:16.0.8'
// Getting a "Could not find" error? Make sure that you've added
// Google's Maven repository to your root-level build.gradle file
}
(Optional) Add the dependencies for the other Firebase libraries that you want to use.
Some Firebase SDKs for Android offer an alternative Kotlin extensions library.
Sync your app to ensure that all dependencies have the necessary versions.
Run your app to send verification to Firebase that you've successfully integrated Firebase.
Your device logs will display the Firebase verification that initialization is complete. If you ran your app on an emulator that has network access, the Firebase console notifies you that your app connection is complete.
Add Firebase to your iOS application development
Add Firebase using the Firebase console:
Click Add Firebase to your iOS app and follow the setup steps. If you're importing an existing Google project, this may happen automatically and you can just download the config file.
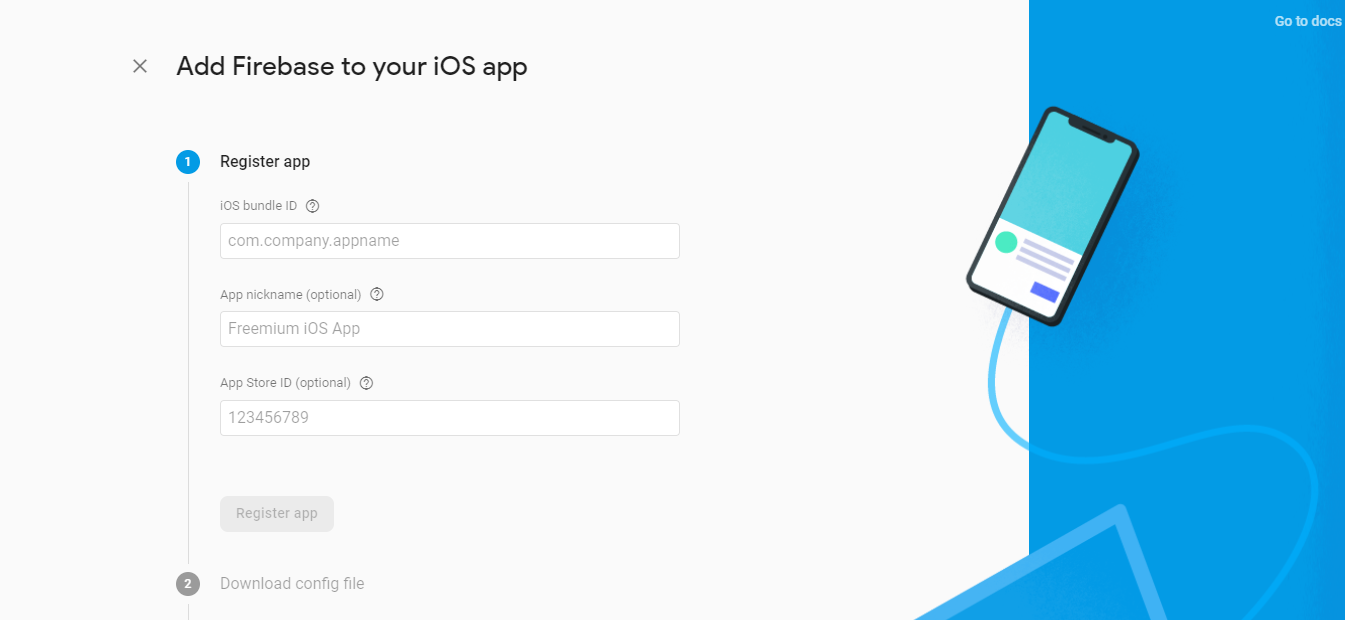
1.When prompted, enter your app's bundle ID. It's important to enter the bundle ID your app is using; this can only be set when you add the app to your Firebase project.
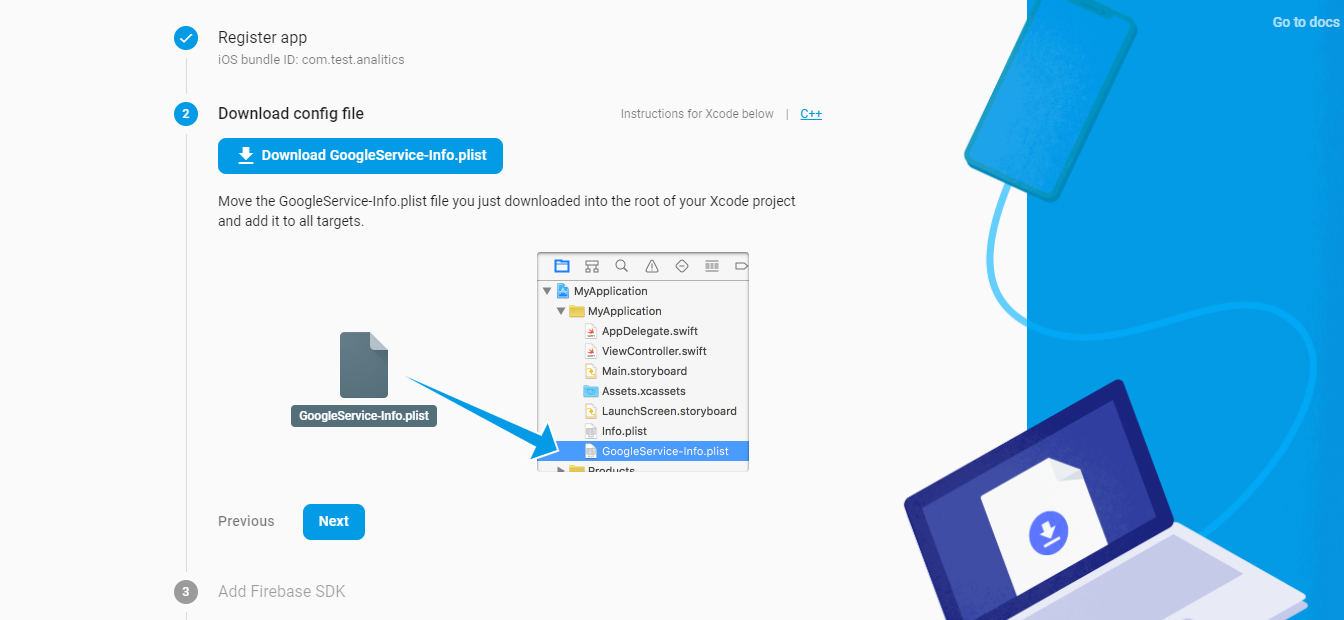
2.Add the Firebase iOS configuration file to your app:
Click Download GoogleService-Info.plist to obtain your Firebase iOS config file (GoogleService-Info.plist).
You can download your Firebase iOS config file again at any time.
Move your config file into the root of your Xcode project. If prompted, select to add the config file to all targets.
3.After you add the initialization code, run your app to send verification to the Firebase console that you've successfully installed Firebase.
4.Add Firebase SDKs to your app:
If you are setting up a new project, you need to install the SDK. You may have already completed this as part of creating a Firebase project.
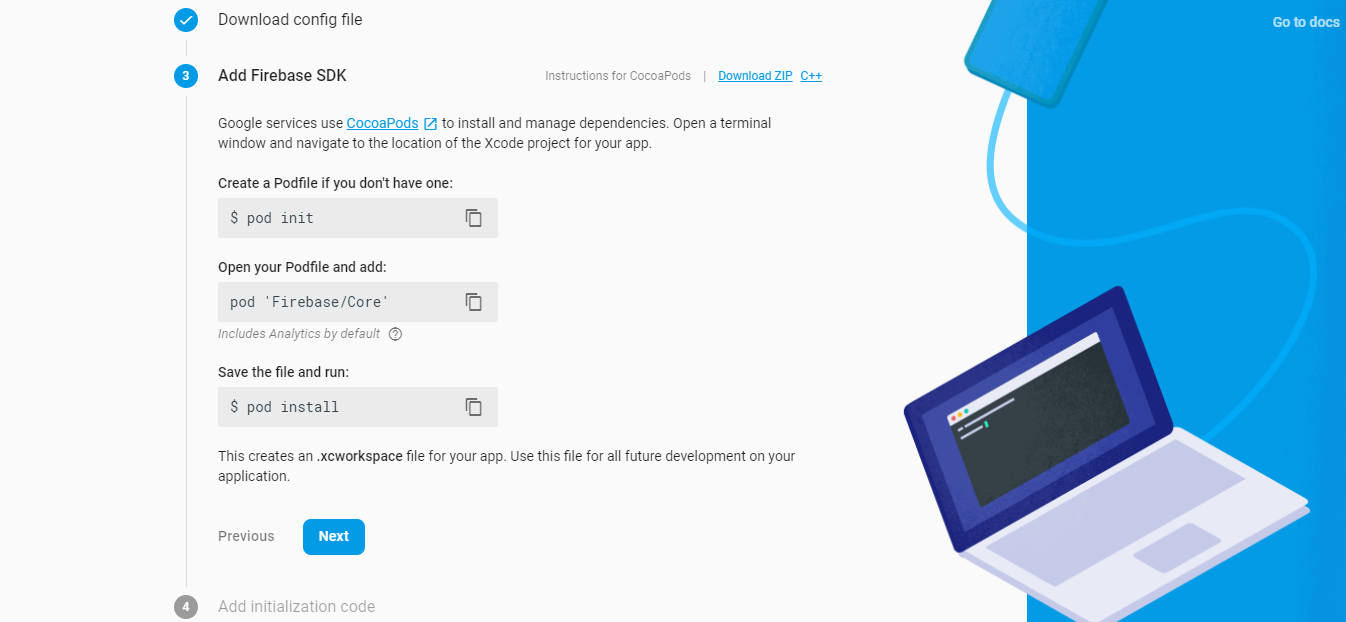
We recommend using CocoaPods to install the libraries. You can install Cocoapods by following the installation instructions. If you'd rather not use CocoaPods, you can integrate the SDK frameworks directly without using CocoaPods.
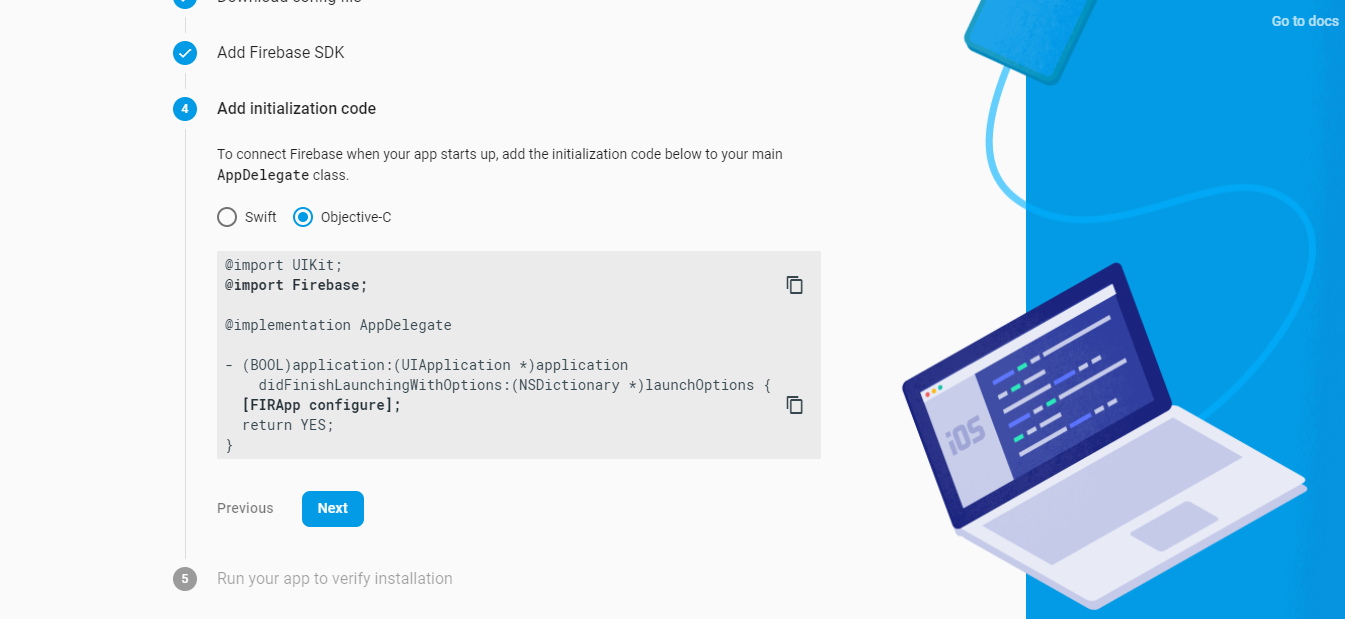
5. To connect Firebase when app starts up, add initialization code below to main AppDelegate class:
In Swift
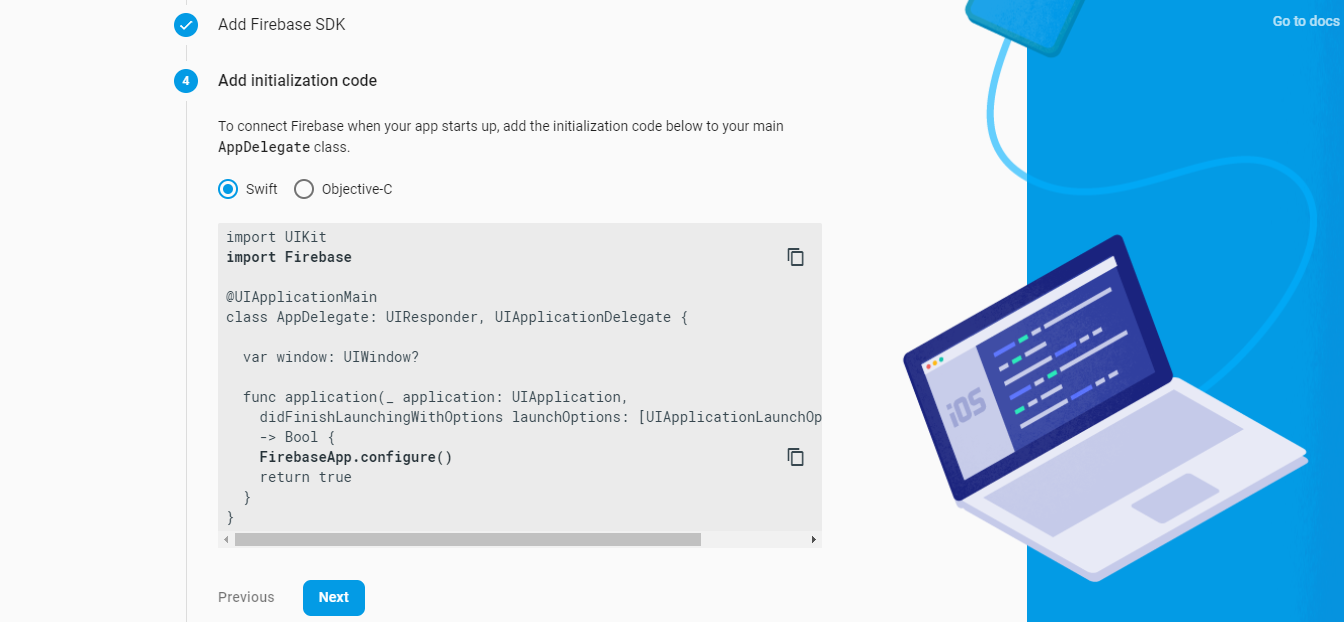
In Objective-C
The Xcode project and Podfile are already present, but you'll still need to install the pods and download the GoogleService-Info.plist file. If you would like to integrate the Firebase libraries into one of your own projects, you will need to add the pods for the libraries that you want to use.
If you don't have an Xcode project yet, create one now.
Create a Podfile if you don't have one:
$ cd your-project directory
$ pod init
Add the pods that you want to install. You can include a Pod in your Podfile like this:
pod 'Firebase/Core'
This will add the prerequisite libraries needed to get Firebase up and running in your iOS app, along with Google Analytics for Firebase. A list of currently available pods and subspecs is provided below. These are linked in feature specific setup guides as well.
Install the pods and open the .xcworkspace file to see the project in Xcode.
$ pod install
$ open your-project.xcworkspace
Download a GoogleService-Info.plist file from Firebase console and include it in your app.
Integrate without CocoaPods
If you don't want to use Cocoapods you can still take advantage of the Firebase SDKs by importing the frameworks directly.
Download the framework SDK zip (this is a ~500MB file and may take some time).
Unzip and see the README file for which Frameworks to include in to your project.
Add the ObjC linker flag in your Other Linker Settings in your target's build settings.
About Author
Recent Blogs
Subscribe to Our Newsletter!
Join us to stay updated with our latest blog updates, marketing tips, service tips, trends, news and announcements!


