Just a month ago, Google rebranded and renamed its famous online payment app 'Tez' – to Google Pay. From personal online payment transaction to sending money in one-tap to help grow small business, Google Pay has enriched the lives of a common man. Not just for the common man, but it also has a great news for the developers. The developers at Google has also rolled out an API for the same. With the Google Pay API, you can easily integrate the Google Pay functionalities and have it handle the payments directly from your application. As of September 2018, Google Pay is offering API only for Android and Web. We will focus on the Android Part.
Let's get started with the overview.
Overview
The Google Pay API enables fast, simple checkout within your app, giving you easy access to hundreds of millions of cards saved to Google Accounts worldwide.
How it works
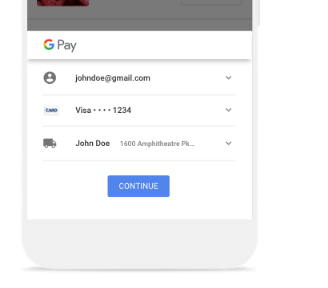
When a user taps the Google Pay payment button, they’ll see a payment sheet that displays the payment methods saved to their Google Account and optional fields such as a shipping address.
Users can then quickly select a payment method and shipping address (optional), or they can add new information.
Before beginning, there are few policies, by Google, that needs to be reviewed:
- You need to comply to the Google Pay API Acceptable Use Policy.
- For ease of use, you should follow the reference documentation that provides supported processors and gateways.
- You need to follow the Google Pay Brand guidelines, their Tutorial, and their Integration checklist.
- Your Android device must have Google Play services version 16.0.0 or higher.
Let's begin by adding the dependencies.
Add the wallet dependency offered by
Google Play services.
– implementation 'com.google.android.gms:play-services-wallet:16.0.0'
Modify your manifest file by adding the Google Pay API meta-data element to the <application> tag.
– <meta-data
android:name="com.google.android.gms.wallet.api.enabled"
android:value="true" />
Tutorial
To integrate Google Pay API into your Android application, follow the tutorial step-by-step and configure your application to accept payment cards.
Step 1: Define your Google Pay API version
Declare the version of the Google Pay API that your app uses and create a base request object that contains properties that are present in all other request objects.
Step 2: Choose a payment tokenization methodGoogle encrypts information about a payer's selected card for secure processing by a supported gateway or directly on a merchant's secured servers.
JSONObject tokenizationSpecification = new JSONObject();
tokenizationSpecification.put("type", "PAYMENT_GATEWAY");
Replace example with a gateway identifier of a Google-supported gateway. Visit here for more information.
Step 3: Define supported payment card networks
Define the card networks that your app accepts.
Some of the popular accepted card networks are
Discover
MasterCard
Visa
Amex
Check with your gateway or processor for the card networks supported and support for Android device tokens, before beginning with the actual implementation.
Step 4: Describe your allowed payment methods
Combine your supported authentication methods and supported card networks in order to describe your app's support for the CARD payment method.
JSONObject cardPaymentMethod = new JSONObject();
cardPaymentMethod.put("type", "CARD");
cardPaymentMethod.put(
"parameters",
new JSONObject()
.put("allowedAuthMethods", getAllowedCardAuthMethods())
.put("allowedCardNetworks", getAllowedCardNetworks());
For more information about supported parameters, visit this page.
Step 5: Create a PaymentsClient instance
To interact with the Google Pay API, create an instance of PaymentsClient in the onCreate method in your Activity.
mPaymentsClient =
Wallet.getPaymentsClient(
this,
new Wallet.WalletOptions.Builder()
.setEnvironment(WalletConstants.ENVIRONMENT_TEST)
.build());
Step 6: Determine readiness to pay with the Google Pay API
Add your allowed payment methods to your base request object:
JSONObject isReadyToPayRequest = getBaseRequest();
isReadyToPayRequest.put(
"allowedPaymentMethods",
new JSONArray()
.put(getBaseCardPaymentMethod()));
Call the 'isReadyToPay' API to determine if the user can make payments using the Google Pay API. For more information, visit the official google developer website.
Step 7: Create a PaymentDataRequest object
A PaymentDataRequest JSON object describes the information you would like to request from a payer in a Google Pay payment sheet.
Provide information about the transaction price and the status of the provided price.
Provide a user-visible merchant name.
Assign your base request object to a new PaymentDataRequest JSON object. Add the payment methods supported by your app including any configuration of additional data expected in the response. Also, add information about the transaction and the requesting merchant.
Step 8: Register event handler for user gesture
Implement a click listener to request display of a Google Pay payment sheet after user activation of a Google Pay payment button.
public void onClick(View v) {
PaymentDataRequest request =
PaymentDataRequest.fromJson(paymentDataRequest.toString());
if (request != null) {
AutoResolveHelper.resolveTask(
mPaymentsClient.loadPaymentData(request),
this,
// LOAD_PAYMENT_DATA_REQUEST_CODE is a constant //integer value you define
LOAD_PAYMENT_DATA_REQUEST_CODE);
}
}
The PaymentDataRequest object is a Parcelable representing a payment data request, which provides information that is necessary in order to support a payment.
Step 9: Handle the response object
A PaymentData object is returned to onActivityResult after a payer has successfully provided the requested information in the Google Pay payment sheet.
Convert a successful response to JSON in order to pass payment information to your processor and to present the user with a confirmation of their purchase.
For more detailed steps, visit the official site.
Completed with the coding part, the designing of the Google Pay payment button has their own rules & regulations, which are mentioned here:
1. “The Google Pay payment button should always call the Google Pay API.” – This is something that we all should agree upon. The payment button should work the way it is intended for.
2. These button are available as re-sizable bitmaps (Nine-Patch files), suitable for your Android and web layout. All Google Pay payment buttons displayed on your site or app must comply to brand guidelines, including, but not limited to the following:
Sizing relative to other similar buttons or elements of the page.
Contrast with the background color of the surrounding area.
Clear space.
3. Payment buttons are available with localized versions of the "Buy with" text. The Google Pay brand is needs to be untranslated, always. It's against the brand guidelines to create buttons with your own localized text.
4. Clear space – It is strictly specified to maintain the minimum clear space of 8 dp on all sides of the payment button. Ensure the clear space is never broken with graphics or text.
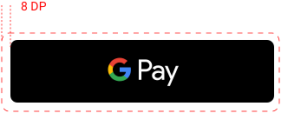
5. Minimum width - The Google Pay button should have a minimum width of 90 dp. All "Buy with Google Pay" payment buttons should have a minimum width of 152 dp.
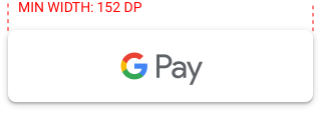
Some more dos and don'ts are listed down below:
| Dos | Don't |
| Use only the Google Pay buttons provided by Google. | Don't create your own Google Pay buttons or alter the font, color, button radius, or padding within the button in any way. |
| Use the Google Pay buttons to initiate the payment flow. | Don't use Google Pay payment buttons to initiate any action other than the payment flow. |
| Use the same style of button throughout your site. | Don't switch between color variations or versions with or without text. |
| Ensure that the size of the Google Pay buttons remains equal to or larger than other buttons. | Don't make the Google Pay button smaller than other buttons. |
| Ensure that you choose a button color that contrasts with your background. | Don't use a button color that's similar to the background. For example, don't use the white button on a white background. |
Regarding Google Pay logo and mark, use either the Google Pay logo or the Google Pay mark when showing Google Pay as a payment option during your payment.
If you're using logos to represent payment options, use the Google Pay logo and continue to use it throughout your buy flow.
If you're using the credit card format to represent payment options, use the Google Pay mark and continue to use it throughout your buy flow.
These screens listed below represent a recommended Google Pay buy flow for a shopping cart experience :
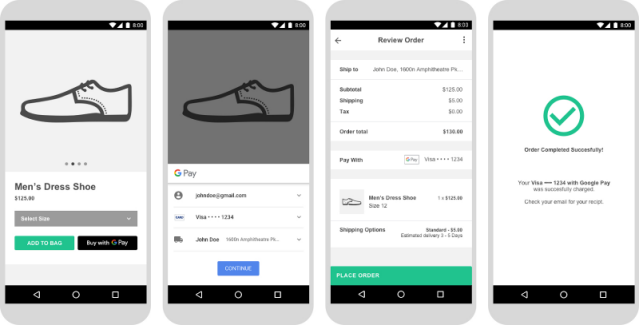
Once you've integrated the Google Pay API, you'll need to get approval for all of the places where you display or reference Google Pay within your UI in order to gain production access.
Before submitting your app integration for review, you need to follow the integration checklist to ensure you've completed all of the required steps in your Android integration.
The integration checklist, on Google Pay API website, consists of Basic, Brand related and Functional testing which needs to be taken care of.
Violating any one of the exit criteria may result in suspension or rejection of your app.
After you validate that you've fulfilled the exit criteria, you need to click Request production access to begin the process of obtaining production access.
This process of obtaining production cases requires some basic information about you and your application.
Sign your app with release keys
When your app is pointed to the Google Pay API production environment, the Google Pay API returns ERROR_CODE_MERCHANT_ACCOUNT_ERROR (405) if the signing key fingerprint used to sign the Android app does not match the release key fingerprint registered with Google Play.
This error typically occurs after an app in development switches from the test environment to the production environment.
To resolve this error, make sure that the fingerprint provided to Google matches the fingerprint of the key used to sign the Android app. Once an Android app is signed, you can verify the fingerprint of the key used for signing it.
Configure your app for production
Use the following steps to configure your application for production:
Make sure that your APK is signed with the release key, not with the debug key you used in the test environment, as it will not work in the production environment.
Set the WalletOptions environment parameter to WalletConstants.ENVIRONMENT_PRODUCTION. Enable your app in the Google Pay Developer Profile
To grant your app production access, navigate to your Google Pay Developer Profile. Click Enable applications and then click Enable next to your app name. Launching your app on the Play Store After a final review from Google, you can launch your app to the Google Play Store through your Google Play Developer Console.
Psst, there is separate customized APIs for Google Pay in India. So if you are from India or you want to implement payment solutions for businesses that operate there, you need to use the Google Pay APIs for India.
About Author
Subscribe to Our Newsletter!
Join us to stay updated with our latest blog updates, marketing tips, service tips, trends, news and announcements!


